Since the release of the last Stable version of the PageSpeed on November 8, 2017, it is being used as a highly useful module for both Nginx and Apache. Even in 2022, achieving the equal performance of PageSpeed with other tools requires greater effort and work hours compared to installing the PageSpeed module.

Though Apache was the king in its own domain, nginx is grabbing the market share quite fast, and as per the report from W3Techs, nginx has more market share than Apache.
![]()
In this article, I’ll describe how to install the Google PageSpeed module for nginx using the Nginx Official Docker image.
Shortcut
In case you don’t want to do all these by yourself and want to have a docker image ready with PageSpeed pre-built, I have released an image in the Docker Hub Container Image Library for nginx 1.20.2: https://hub.docker.com/r/rupokify/nginx-pagespeed
You can simply run that image and have your nginx with PageSpeed pre-built container up and running in a few minutes with a single command:
docker run -d -p 80:80 rupokify/nginx-pagespeed:1.20.2
You can change the port 80 to your desired port in the above command and almost instantly you will have your nginx server ready with PageSpeed inside the Docker container.
Steps to Install:
If you are more into manually building stuff, let’s begin.
At first, you have to install Docker if you haven’t done this already. You can find the official installation instructions on the Docker website: https://docs.docker.com/get-docker/
Once Docker is installed and running, you can run the Nginx Official Debian Stable image with the following command:
docker run -d -p 80:80 nginx:1.20.2
This will bind port 80 of the docker container to your host machine’s port 80. So you can navigate to http://localhost and you should see the nginx welcome page.
If things went fine until this point, then we can proceed with installing the PageSpeed module.
To access the shell of the nginx docker container, we need to find the container ID. To get that, run:
docker ps
It should give you the IDs of all the running containers on your system. Copy the container ID for the nginx container. Then run the following:
docker exec -it CONTAINER_ID /bin/bash
Replace CONTAINER_ID with the actual container ID you copied in the previous step.
It should load the bash of the container. If you could reach this point, then we are ready to install the PageSpeed module.
Now, we should begin with updating the Debian system:
apt update
Then we will need to install all the required libraries for compiling PageSpeed from the source. To install those, run the following command:
apt install sudo libssl-dev libxslt-dev libgd-dev curl nano gnupg2 ca-certificates lsb-release git dpkg-dev uuid-dev -y
After installing the required libraries, we have two ways to build the PageSpeed from source:
- Automated Install
- Manual Install
Here we will be using the Automated Installer but I’ll write another article on installing the PageSpeed module manually and will link it here.
To use the automated installer, run the following command:
bash <(curl -f -L -sS https://ngxpagespeed.com/install) --nginx-version 1.20.2 -y
This will download all the required things and process things automatically for you. To confirm that the things went fine, please look inside your “/root/” directory and look for these two folders “nginx-1.20.2” and “incubator-pagespeed-ngx-latest-stable”. If you see both the folders inside the root directory, then we are good to go to the next step.
If the previous step went fine, we need to find out the current nginx configuration parameters. To find that out, run the following command:
nginx -V
This will show you the current configuration arguments for nginx. Copy this somewhere because we will need it in the next step.
Now we need to configure nginx and add PageSpeed as a dynamic module. To do that, get inside the “/root/nginx-1.20.2/” folder and run these two commands:
./configure --with-compat --add-dynamic-module=/root/incubator-pagespeed-ngx-latest-stable/ --prefix=/etc/nginx --sbin-path=/usr/sbin/nginx --modules-path=/usr/lib/nginx/modules --conf-path=/etc/nginx/nginx.conf --error-log-path=/var/log/nginx/error.log --http-log-path=/var/log/nginx/access.log --pid-path=/var/run/nginx.pid --lock-path=/var/run/nginx.lock --http-client-body-temp-path=/var/cache/nginx/client_temp --http-proxy-temp-path=/var/cache/nginx/proxy_temp --http-fastcgi-temp-path=/var/cache/nginx/fastcgi_temp --http-uwsgi-temp-path=/var/cache/nginx/uwsgi_temp --http-scgi-temp-path=/var/cache/nginx/scgi_temp --user=nginx --group=nginx --with-compat --with-file-aio --with-threads --with-http_addition_module --with-http_auth_request_module --with-http_dav_module --with-http_flv_module --with-http_gunzip_module --with-http_gzip_static_module --with-http_mp4_module --with-http_random_index_module --with-http_realip_module --with-http_secure_link_module --with-http_slice_module --with-http_ssl_module --with-http_stub_status_module --with-http_sub_module --with-http_v2_module --with-mail --with-mail_ssl_module --with-stream --with-stream_realip_module --with-stream_ssl_module --with-stream_ssl_preread_module --with-cc-opt='-g -O2 -ffile-prefix-map=/data/builder/debuild/nginx-1.20.2/debian/debuild-base/nginx-1.20.2=. -fstack-protector-strong -Wformat -Werror=format-security -Wp,-D_FORTIFY_SOURCE=2 -fPIC' --with-ld-opt='-Wl,-z,relro -Wl,-z,now -Wl,--as-needed -pie'
make modules
Then copy the “ngx_pagespeed.so” file from the “/root/nginx-1.20.2/objs/” folder to the “/etc/nginx/modules” folder.
After that, you can delete both the “nginx-1.20.2” and the “incubator-pagespeed-ngx-latest-stable” folders.
Then open the nginx configuration file at /etc/nginx/nginx.conf file and add the following line at the beginning of the nginx configuration file:
load_module modules/ngx_pagespeed.so;
Now we need to create the directory for the PageSpeed cache. Create a folder inside the “/var/” directory named “ngx_pagespeed_cache” and then change the owner of that directory with the following command:
chown -R www-data:www-data /var/ngx_pagespeed_cache
Once this is done, you need to edit your site-specific nginx configuration file and add the following to that file and save.
pagespeed on;

pagespeed FileCachePath /var/ngx_pagespeed_cache;

location ~ "\.pagespeed\.([a-z]\.)?[a-z]{2}\.[^.]{10}\.[^.]+" {
  add_header "" "";
}

location ~ "^/pagespeed_static/" { }
location ~ "^/ngx_pagespeed_beacon$" { }
After saving the file, simply test the nginx configuration and reload nginx.
You can also stop nginx auto-update so the nginx doesn’t get updated automatically with the following command:
apt-mark hold nginx
And we have our PageSpeed module ready for nginx. To test this, make a curl request to your nginx site:
curl -I http://localhost
It should return something like this:
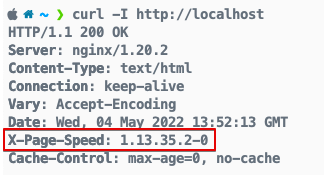
If you see the “X-Page-Speed” header in the output, then we are done! ?
Congratulations. You have built the PageSpeed module from source using the official Nginx Docker Image. You can further configure the PageSpeed module following the documentation here: PageSpeed Configuration
I hope this helped. Feel free to let me know if you have any questions in the comments section below. Happy PageSpeeding ?