For different reasons, you may need to create and launch a virtual machine on your computer. From playing with multiple operating systems to learning new technologies, creating a virtual machine sounds more logical than purchasing and setting up multiple physical computers or setting up multiple operating systems and then configuring the boot mechanism to allow booting into multiple operating systems.
There are quite a few popular and very powerful virtualization software available now. For example, Oracle VirtualBox, VMware Fusion, VMware Workstation Pro, UTM and many more. Each has it’s own pros and cons, unique and common features but in general, all of those serve the same purpose – create virtual machines on your computer.
In case you are wondering what a virtual machine actually is:
A virtual machine, commonly shortened to just VM, is no different than any other physical computer like a laptop, smart phone, or server. It has a CPU, memory, disks to store your files, and can connect to the internet if needed. While the parts that make up your computer (called hardware) are physical and tangible, VMs are often thought of as virtual computers or software-defined computers within physical servers, existing only as code.
Source: Microsoft
In brief, a virtual machine is a virtual computer which works on your existing physical hardware but acts like a dedicated new computer utilizing the allocated resources from your physical computer.
When you need to launch just one or two VM within a longer period of time, it may not matter much. But when you have to create virtual machines and launch them every day, then the process becomes very tedious. You have to manually assign CPU cores, set the storage, assign memory, then create virtual machine storage, etc. for each of the VM you want to create. Some of the virtualization software come with CLI support but not all of them are very efficient or robust. To solve this problem, Canonical (the company behind the popular distro Ubuntu) came up with a solution named Multipass to easily orchestrate the virtual machines.

Get an instant Ubuntu VM with a single command. Multipass can launch and run virtual machines and configure them with cloud-init like a public cloud. Prototype your cloud launches locally for free.
One thing to note here, Multipass doesn’t allow creating a virtual machine with any operating system. It allows you to create virtual machines using Ubuntu only. It also allows creating virtual machines with pre-configured applications like NextCloud, Plex Media Server, Minikube, etc.
The best part of Multipass is that being a VM orchestration tool, it allows you to use your desired virtualization drivers.
- qemu, libvirt, and lxd on Linux.
- hyperv and virtualbox on Windows.
- hyperkit and virtualbox on Intel macOS.
- qemu on M1 macOS.
So, Multipass doesn’t only support Windows, macOS, and Linux but it also supports Apple M1 which is just awesome.
To set your desired virtualization driver, you can run the following command in your terminal:
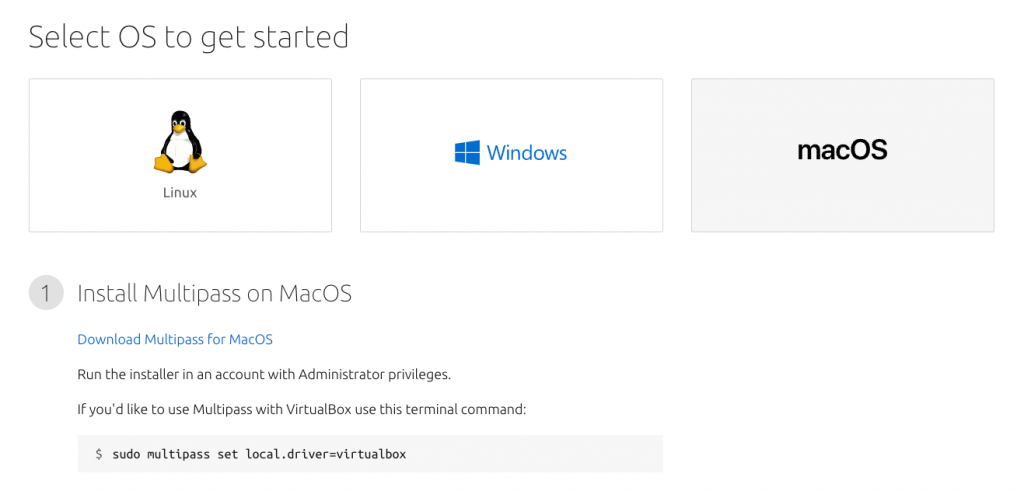
sudo multipass set local.driver=virtualbox
Simply replace “virtualbox” with your desired driver name and make sure that driver is available for your operating system.
Let’s see how you can utilize Multipass to create multiple virtual machines and configure them in your own way with just a few simple CLI commands.
Installation:
To use Multipass, at first you have to install it. Installation is very easy. You need to go to Multipass website and click on your operating system icon. It will display the installation instructions for your operating system.
If you are using macOS, you can also install Multipass using Homebrew. If you have brew installed, you just need to run the following command to install Multipass using Brew:
brew install --cask multipass
Once installed, you are ready to use Multipass for your VM orchestration.
Usage:
First, you need to find out the available images in Multipass. To do that, simply run the following command in your terminal or terminal emulator:
multipass find
Once you get the list of the available images, you need to pick the Image Name from the list. Then you are ready to launch your virtual machine. Simply run the following command (replace “ansible-target-two” with your desired virtual machine name) and hit enter:
multipass launch -n ansible-target-two
And your virtual machine will be ready in a few seconds or minutes depending on the speed of your internet connection.
If you want to define how many CPU cores will be assigned to the VM, you can do it with the “-c” flag. Default is 1. If you set 2 as the flag value, it will assign 4 CPU cores to the VM:
multipass launch -c 2
You can also assign your desired memory for the VM with the “-m” flag. The default value is 1G but the minimum you can set is 128M:
multipass launch -m 4G
Then you can assign desired storage size with the “-d” flag. The default value is 5G but the minimum you can set is 512M:
multipass -d 20G
Now, you may be happy with the NAT network but in case you need your virtual machine to get an IP Address from your own network, you can assign Bridged Network for your VM. To do that, first find the available networks with the following command:
multipass networks
Then you can use the network name from the output of the previous command to assign Bridged Network to your VM:
multipass launch --network en2
Another very powerful feature of Multipass as an orchestration tool is the capability of using cloud-init. You can prepare your VM using cloud-init during launch. To do that, at first, you have to create your cloud-init configuration file. Then you can pass the file name with the “–cloud-init” flag to launch your VM with your own cloud-init configuration:
multipass launch --cloud-init cloud-init-config.yaml
So, if you want to utilize all the parameters, the command will look something like this:
multipass launch --network en2 -n ansible-target-two -c 2 -m 4G -d 20G --cloud-init cloud-init-config.yaml
And your VM will be ready with just one command. It’s that simple.
These are the very basic things you may want to configure while launching your VM but Multipass is not limited to these. You can get all the other options from the reference section of Multipass. Soon I’ll update this article with further usage of Multipass so if you are interested in that, you can bookmark this article.
Stay safe, happy VM orchestration!